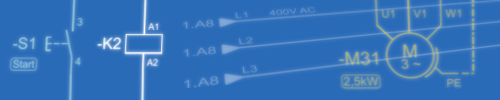
Two controllers manage a single indoor unit (e.g., up and down stairwells). One unit must be designated as the Master and the other as the Slave via its internal dip switch or field settings.
These are used for Daikin SkyAir and VRV commercial systems.
Ensure no wiring is pinched between the front and rear casings. 6. Initial Configuration and Field Settings
Do not install the controller in direct sunlight, near external doors or windows, or close to localized heat sources like lamps, televisions, or supply air ducts. daikin brc1c51 61 installation manual
Press the once to enter setting mode (the day will blink). Use the UP/DOWN buttons to select the day. Press RTC to confirm and move to the hour setting. Adjust the hours and minutes using the same method.
Below is a helpful summary of the installation and initial setup steps based on standard Daikin technical manuals 1. Pre-Installation Check Power Off: shut off the main power supply at the circuit breaker before starting any electrical work. Avoid Interference: Install the controller away from power lines to avoid electrical noise that could disrupt communication.
: Provides standard functions including ON/OFF, operation mode change-over, temperature adjustment (16–32°C), and air volume/flow direction control. System Indicators Two controllers manage a single indoor unit (e
Align the upper tabs of the remote controller case with the lower installation plate.
Look at the back of the front circuit board assembly before snapping it into place.
Complete Installation Manual Guide for Daikin BRC1C51 / BRC1C61 Remote Controllers Ensure no wiring is pinched between the front
: Mount the lower case (back plate) to a flat wall or pillar using the provided screws. Avoid over-tightening, as this can deform the plate and prevent the upper case from snapping on correctly.
Near heavy machinery or power lines that cause electrical noise.
 english
 français
 deutsch